
Welcome to scenic Khaos-5! On your left, you’ll see a civilization run by the blue robot tribe. On your right, another run by the red robot tribe. They’ve been created to despise each other for the last 5 millennia, and they aren’t shy about fulfilling their programming! And if you direct your attention skyward, you’ll see the meteor that’s going to crush us all.
Wait. The meteor that will crush us all?! Shouldn’t someone sound the emergency klaxons? Oh well. To the Khaos Magnets! Oh, and if you want a procedurally generated scenario of what could happen if the tribes come into conflict with each other during this crisis, you can watch the Blastbots board game video below to see our worst-case outcome played out by our top tacticians.
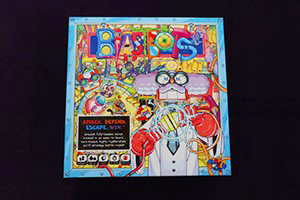
Blastbots Game Rules – How To Play
Player Count: 2-4
Estimated Play Time: 25-45 minutes
Blastbots Rules PDF
A meteor is hurtling toward Khaos-5, and each player represents the leader of a tribe of colored Blastbots (blue, red, purple, and orange).
Barring some form of intervention, that meteor is going to strike the planet in a mere 10 rounds, and anything unfortunate enough to still be there when it arrives will be wiped out!
But that isn’t important. What matters is ensuring your tribe has the most influence among the remaining survivors so you can run your new, probably much less populated, society the way you want, and not according to the whims of those inferior other robot tribes!
The good news: You have 3 routes to victory, and access to your planet’s finest weapons, rockets, and technology to make that happen.
The bad news: So do the leaders of the other 3 robot tribes.
Blastbots Setup
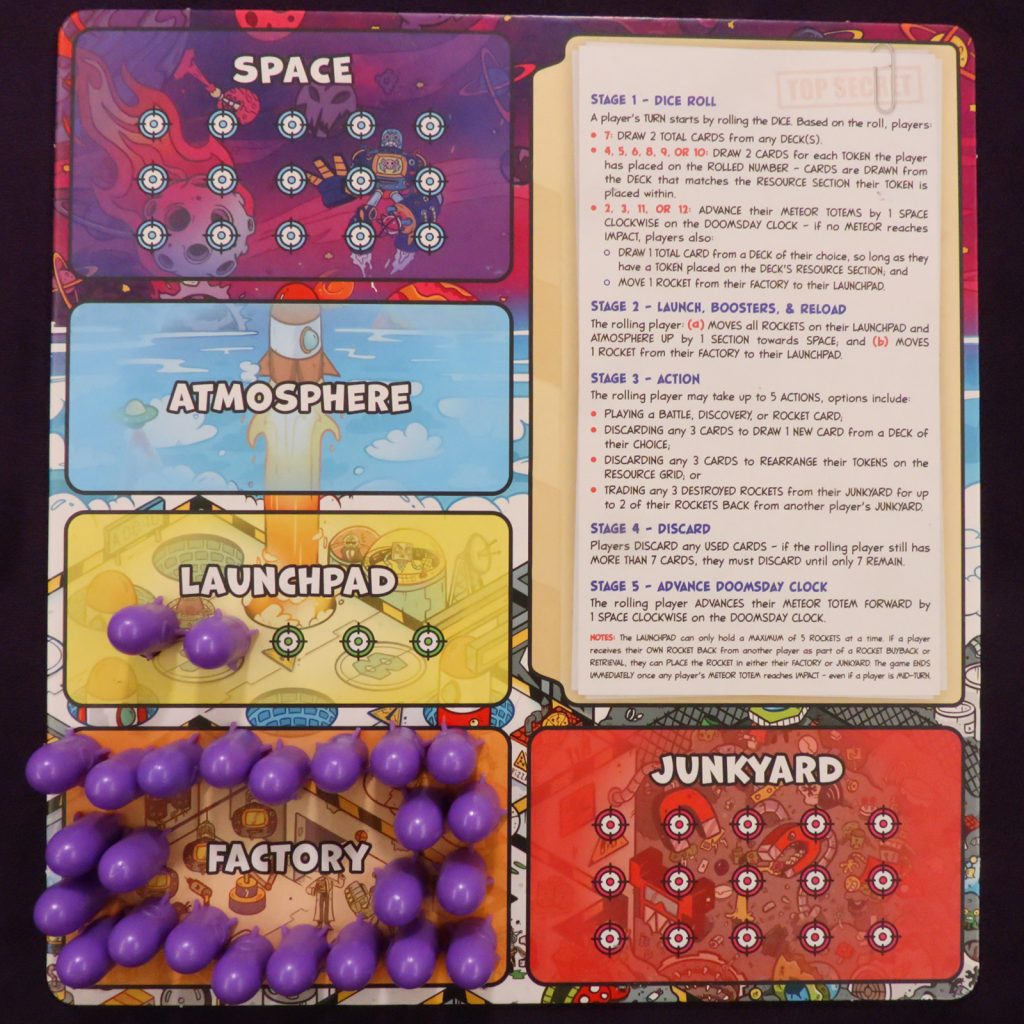
Start by setting the circular Blastbots board (known as the Resource Grid) in the middle of the table and give everyone a Launch Grid to place in front of them. Players will each then select a color of Blastbots to play as, setting the 5 disks in their bag to the side. Everyone places 2 rockets on their Launchpad and the rest (23) in their factory, as demonstrated in the picture below.
Next, you’ll roll 2d6 to determine the first player, with play proceeding clockwise from them once the game starts. If someone rolls a 12 during this process, they are immediately awarded the distinction of going first, preventing anyone else from rolling to steal this prestigious position.
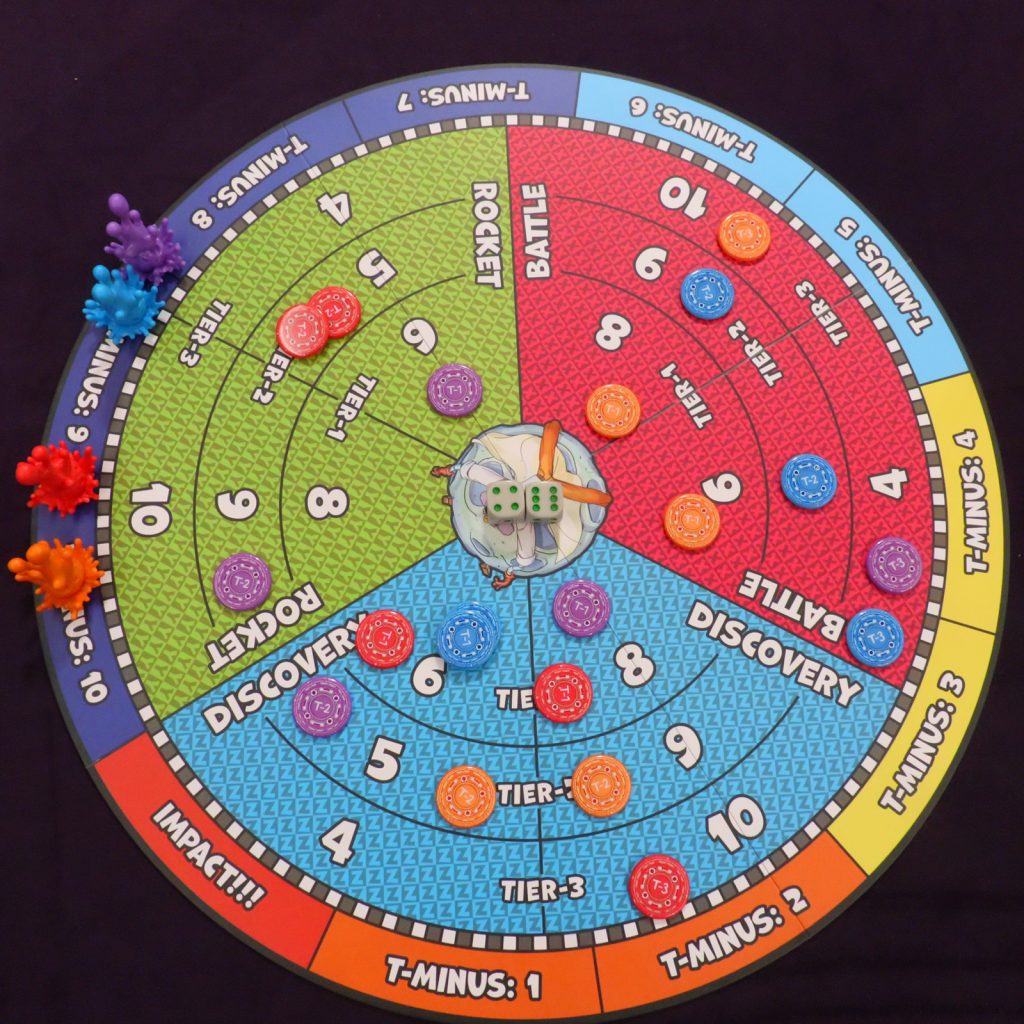
Once your turn order is set, it’s time to address those disks you set to the side a moment ago. The first player will place each of their disks on the circular Resource Grid. 2 disks will be labeled T-1, 2 will be labeled T-2, and 1 will be labeled T-3.
These correspond to Tier-1 (6 and 8), Tier-2 (5 and 9), and Tier-3 (4 and 10) on the grid, with each tier having access to its numbers in neon pink, green, or blue. These placements will dictate what types of cards you get when a 4-10 is rolled on 2d6 by any player, much like you would see with resources in Settlers of Catan:
- Pink cards are for battle – you’ll use these to attack your opponents’ hands and/or rockets, or occasionally accelerate your own to Space.
- Green cards are for your rockets – you’ll use these to get more rockets on your Launchpad and make more favorable Junkyard trades.
- Blue cards are for discovery – this deck contains the Khaos Magnets that manipulate the meteor, as well as a number of other tricky cards.
There is no restriction on where you may place these disks within their respective tiers, so if you really want to load up on a pair of red 6s, a pair of red 5s, and a red 4 for an all or nothing battle strategy, you can definitely do that (though you should stack your disks on each other if you put them in the same place on the grid).
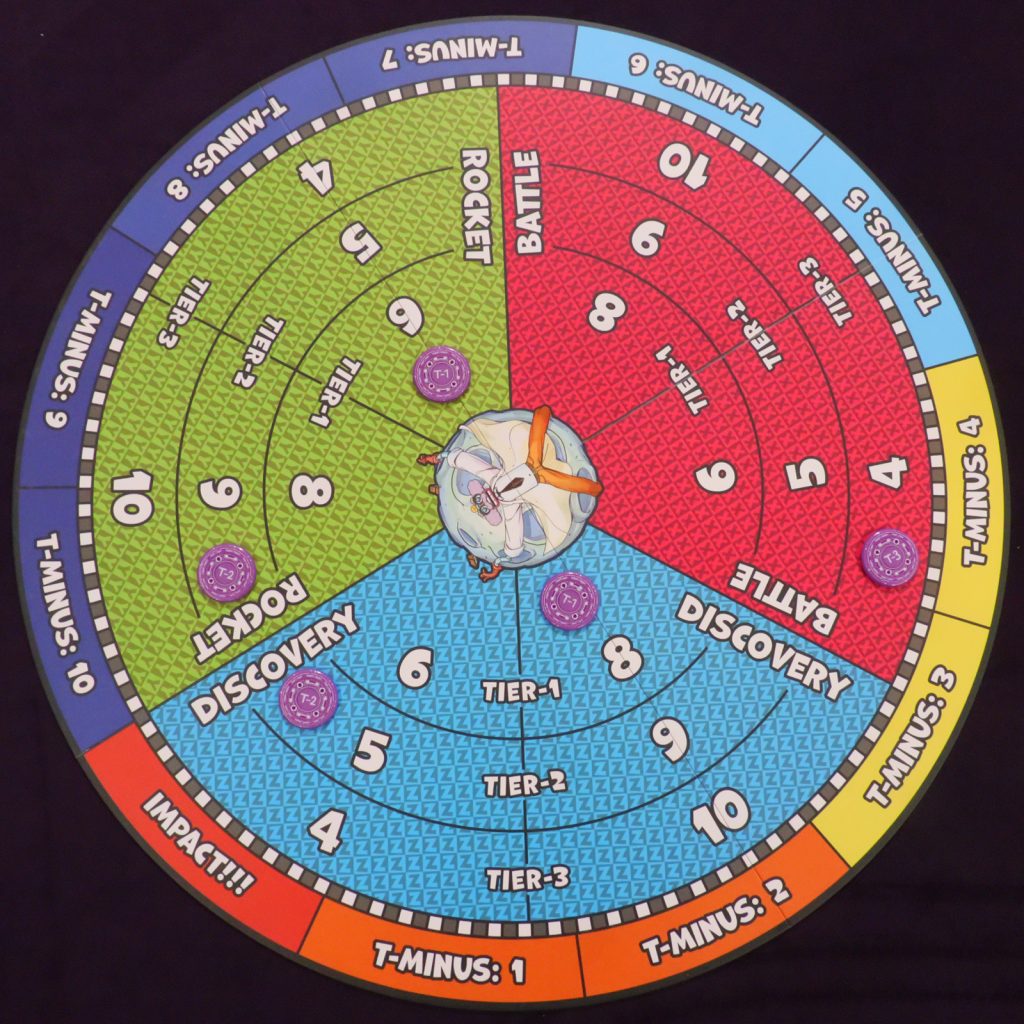
The observant among you may have noticed the “T-Minus: 10” countdown going around the Resource Grid. Each player is going to place a Meteor totem matching their color on the T-Minus: 10 space. At the end of every player’s turn, they will move their Meteor totem one stem down the track, known as the Doomsday Clock.
Should any player’s totem reach Impact!!!, the game immediately ends. Which is probably bad, unless it isn’t – more on that in a bit. For now, let’s talk gameplay!
Blastbots Gameplay
A turn in Blastbots is broken into 5 stages:
- Roll 2d6
- Launch, Boosters, and Reload
- Take up to 5 Actions
- Discard any used cards, then the turn player discards down to 7 cards in their hand if they are holding more than 7
- Advance your token on the Doomsday Clock
Stage 1: Roll 2d6
After rolling your 2 six-sided dice, everyone will do the following, depending on what you roll:
- 4, 5, 6, 8, 9, or 10: Give out 2 Resource cards from the appropriate deck(s) for each disk a player has on the rolled number of the Resource Grid.
- 2, 3, 11, or 12: Move all Meteor totems forward 1 step on the Doomsday Clock. If nobody has caused Impact!!!, all players draw 1 card from any deck (so long as they have a disk on the Resource Grid for it), then move 1 rocket from their their Factory to their Launchpad (assuming there is room).
- 7: Draw a total of 2 cards in any combination from the 3 Resource decks.
Note: If a Resource deck runs out of cards, you don’t get to reshuffle it. There just won’t be any distributed for the rest of the game!
Step 2: Launch, Boosters, & Reload
After resolving the results of your dice roll, you will advance all rockets on your Launchpad and Atmosphere by 1 section toward Space, then move 1 rocket from your Factory to your Launchpad.
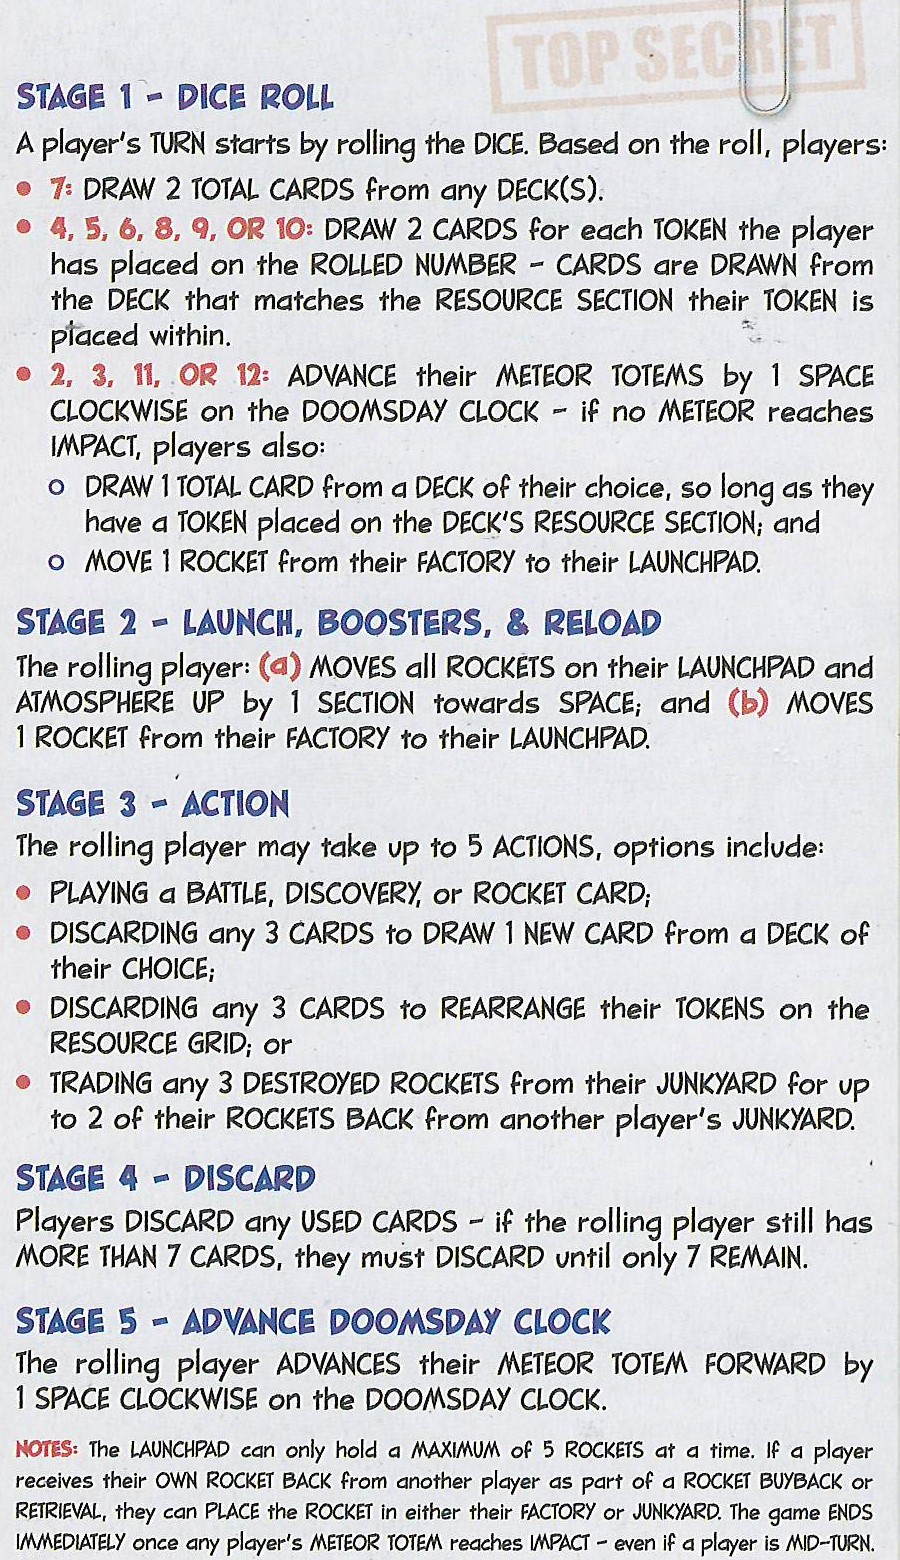
Step 3: Take Up To 5 Actions
You may take any of these actions your turn, even multiple times, so long as you do not exceed a total of 5:
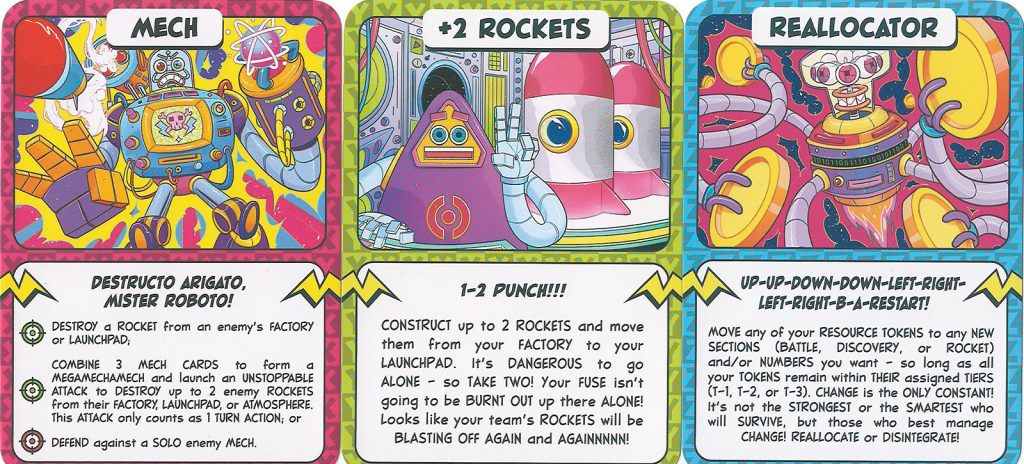
- Play a Resource card from your hand (any color)
- Discard any 3 cards from your hand to draw a new card from any Resource deck
- Discard any 3 cards from your hand to rearrange all disks you have on the Resource Grid
- Trade any 3 rockets from your Junkyard for up to 2 of your own rockets from another player’s Junkyard.
- Note: If you initiate a trade, you place your rockets in your Factory. If you receive rockets of your own color back from someone else’s trade or as a result of a card like Burglebot, you may choose to place them in either your Junkyard or Factory.
- Note: Rockets will end up in a player’s Junkyard if they are the one responsible for destroying them.
Most actions will be spent playing cards from your hand in our experience, but as the game goes on and rockets meet more and more “accidents”, trades also start to creep into the action economy on a regular basis.
Place any cards you play in front of you or next to your Launch Grid – do not place them into the discard pile until you are finished taking actions. Trading between players is also not allowed – you are at war with each other, after all.
Step 4: Discard Phase
Now you can discard the cards you played as actions (this matters because some cards allow you to root through the discard piles, meaning you typically aren’t allowed to retrieve a card you played on the same turn). If you have more than 7 cards in your hand, you also discard cards of your choice until you have 7.
Step 5: Advance Your Meteor Token On The Doomsday Clock
1 step at the end of every one of your turns. Remember, if this causes you to reach Impact!!!, the game immediately ends.
How To Win Blastbots
As was mentioned earlier, there are 3 ways you can win against your rival robot tribes:
- Escape Victory: Be the first leader to get 15 of your ships into Space. With superior numbers, you should be able to control your civilization’s new future with ease!
- Destruction Victory: Be the first player to fill your Junkyard with 15 destroyed rockets. With superior firepower, might makes right!
- High Score Victory: Have the highest score after a Meteor totem makes Impact!!!. Yours were the plans closest to fruition, so you’ll be the one running the show – what’s left of it, anyway.
The moment an Escape or Destruction victory condition is achieved, much like when a Meteor totem reaches Impact!!!, the game immediately ends, even if someone is in the middle of their turn.
So how does one determine who has the High Score when Khaos-5 is wiped out by the meteor? Total your points for these achievements:
- 1 Point for every Rocket in your Junkyard – Kablammo!
- 1 Point for every Rocket in your Atmosphere – Well, those guys sorta escaped…
- 2 Points for every Rocket you got into Space – …but these guys ACTUALLY escaped.
- 2 Points if you used a Khaos Magnet on your turn to end the game – but only if your Meteor totem started the turn at T-Minus: 2 or further out. We only credit harebrained schemes in this society, not lazily nudging a meteor that was crashing anyway.
- 3 Points if your tribe has the most Rockets in Space – And it has to be the most. If two or more robot leaders are tied, nobody gets the points because you’ll argue until your circuits fail about who deserves to rule the slipspace more.
- 3 Points if your tribe has the most Rockets in the Junkyard – No ties are allowed here either. Otherwise, those vying for first would get out their weapons, codenamed Flyswatters, to try and take the lead, and we’re trying to rebuild society – not make a Space Junkyard.
The aversion to ties also extends to total scores as well, but since there has to be a winner, our society has agreed that we can only hold enough short-term memory to remember the most recent accomplishment of a tribal leader. Therefore, the winner of a tie will be determined by reverse turn order.
So if Player 3 and Player 4 tie for the High Score, Player 4 will be the victor. Which isn’t supposed to happen often according to Blastbots creator Patrick Begley, but in typical Assorted Meeples fashion, we managed this scenario on our first game. You’ll have to let us know how often it comes up at your tables – we’re very curious.
Blastbots Strategy Guide
So now that you have a firm understanding of the rules of engagement and your victory conditions, it’s time to talk strategy. Here are a few tips and tricks we gleaned from our live experience that will help give you a leg up on your competition.
Plan Your Victory Condition, Then Place Disks On The Resource Grid
Sounds self-explanatory, but if you’re a first time player, this is the easiest thing in the world to forget. Here are some good rules of thumb to help you get started if you aren’t sure of which Resource decks to prioritize:
- Escape Victory: Prioritize the green Rocket cards in Tier-1 and/or Tier-2, dedicating 1-3 of your placements outside of Tier-1 to blue Discovery and/or pink Battle cards.
- Destruction Victory: Pink Battle cards are your top priority, though you’ll probably want to mix in some blue Discovery in Tier-2 and/or Tier-3. Depends on how tricky you want to be.
- High Score Victory: Prioritize pink Battle and blue Discovery cards in Tier-1 and Tier-2, then pick whatever color you like in Tier-3.
We’re of the consensus that the green Rocket deck is probably the weakest standalone deck in a 4 player game, but if you’re playing with fewer players, the power of that deck goes up dramatically due to a smaller number of weapons being used against the extra Rockets you’re putting out.
The pink Battle deck can honestly be a player’s sole focus, especially if the rest of the table is running light on that color. You can rack up a lot of points simply by blowing up others’ Rockets, and since pink cards are typically only able to be countered by other pink cards, you also get to put up a solid defense while attacking your enemies.
Note: Countering pink cards is the only way to play a card outside of your turn!
The blue Discovery deck has the widest variety of cards, including the coveted Khaos Magnets, which can be used to push or pull everyone’s Meteor totem on the Doomsday Clock. While it should never be a sole focus for Resouce gathering, it is almost always a welcome supplement to any strategy.
And if a deck runs empty or you need to shift gears to adapt to a problematic player or board state, remember you can always trade 3 cards in from your hand to put your disks in new places on the Resource Grid!
Avoid Betting On Single Numbers
If you want to ensure the most consistent flow of cards to your hand, putting disks on as many different numbers of the Resource Grid as possible affords you the best chance of having new cards in your hand by the time your turn comes around.
Some like the high risk, high reward move of putting disks on the same number in Tier-1 and Tier-2, but that’s a great way to have too few cards in your hand to use your actions if you’re unlucky during a turn cycle or too many cards if you have the good fortune of having your numbers hit 3-4 times.
Pay Attention To Your Opponents
When world domination is on the table, you focus on the completion of your plan and tune out the distractions around you. We totally get it. But that’s often how a clever opponent will get one over on you in this game. If you’re so focused on blasting Rockets that you don’t notice the player who is building a hand of blue cards, you’ll probably find your momentum rudely stalled out as they combo off.
Active table talk and politicking is a good way to keep these sorts of players on their toes while drawing attention away from you. But there’s a science to how much talking is the right amount – stay too quiet and the table will start to wonder what you’re hiding. Talk too much, and their wrath will turn on you like the Eye of Sauron to put you in your place.
Use Trades To Manage All Junkyards
Trades don’t just put Rockets back in your Factory – they also pull an opponent further away from a Destruction victory. Keeping a vigilant eye on everyone’s Junkyard is a good way to prevent someone from sneaking out an unexpected win while everyone is paying attention to the Rockets that are trying to reach Space.
If You Can Get Rockets To Space, Do So
There aren’t any cards that interact with a Rocket once it gets to Space, so if you happen to draw a card that lets you get one or more up there without waiting, it’s usually wise to prioritize its use before it can get shot down.
Naturally, this also means that if you see an opponent with several Rockets in their Atmosphere, it’s probably time to level some weapons their way so they can’t snag an easy lead.
Attack Players Who Aren’t Holding Battle Cards
If you have a choice between using a pink card on an opponent who is holding 3-4 pink cards or an opponent with nothing but blue and green, you should pick a fight with the latter most times.
As was mentioned earlier. pink cards are the only way to foil pink cards, so this is a good way to ensure your moves aren’t countered if you need the momentum. And let’s face it, you always need the momentum.
Now, if you want to attack another player who is ready for a fight to whittle down their arsenal, there are definitely times and places for that as well, but those are usually closer to endgame, and even then only if they’re a rival for a High Score.
Otherwise, you’re just weakening both of you so the other players can get ahead, and that’s just a bad plan.
Is Blastbots A Good Game?
Robots with the ambitions of power-hungry people who aren’t going to let a little thing like the end of the world interrupt their quest for dominance? I have to admit, I knew this was a game for the Assorted Meeples when Blastbots creator Patrick Begley explained the premise to me at Origins in 2025.
If your group likes the “take that!” style of board games and is comfortable with strategic depth comparable to Settlers of Catan, I think you’ll really get a lot out of Blastbots. There’s still some luck to the gameplay, but you almost never feel like you’re out of the game if you get off to a slow start.
While the comparison to Catan is pretty obvious, Patrick also noted that Bridge was a key model for the design of this game.
One of the models I used for creating the game was Bridge, where the main skill part of the game directly ties to which cards you get and how/when you play them.
Patrick Begley, Blastbots creator
This is interesting because I didn’t really see any real ties to Bridge’s gameplay in Blastbots, but maybe it’s because I play a lot of different card games and Bridge was not among those I grew up with. Or maybe that’s just a key tenet of strategic design a lot of games share that I just take for granted in a good game nowadays.
I also didn’t touch on this much earlier, but this game is absolutely dripping with flavor. Relevant quotes from a variety of authors in the rulebook. A Table of contents that counts DOWN rather than up to remind you of what’s coming in game. Cards that go several sci-fi and nerd culture references deep so you have to reread them to take in all they have to offer.
You don’t get an experience like this without a lot of passion and attention to detail.
Plus a major shoutout for making the Resources friendly for the color-blind – using X, Y, and Z as distinguishing shapes makes cards easy to tell apart at a glance while also being relevant in-universe as the axes of a grid.
The price is also extremely reasonable at $30 ($40 if you want the fancy resin dice with actual meteorite fragments, and let’s be honest, you know you do), so this is an easy recommend for casual and hardcore board gamers in my book.
My one complaint? The game box hurts my eyes. Everything is SO. BRIGHT. But I figure it was made for robots who don’t have to concern themselves with such trivialities as ocular health, so I’m willing (and somewhat forced) to overlook that point. But hey, you’ll never lose this game or mistake it for another on your shelf!
Other Board Game Articles You’ll Love:
- Scallywager Board Game Review
- Project L Board Game Guide
- Axolotl Card Game Review
- Scotland Yard Game Rules
- Cubirds Rules & How To Play Guide
- Godsforge Expansion Review
Braden is a founder of Assorted Meeples and has been a gamer & writer with a vivid imagination all his life. Don’t believe us? Check out his excitement when meeting Goosebumps author R.L. Stine as a kid! An avid Magic: The Gathering spellslinger for over 15 years, you can always convince him to shuffle up for a game (or three!) of Commander.