
If you’ve followed our Twitch channel for any amount of time since late 2020, you’ve probably seen me playing a randomized run of The Legend of Zelda: A Link to the Past for SNES. I had no history of doing randomizers before this, and I hadn’t even played the base game in years when starting.
So why start now? What could have possibly gotten me into this niche?

I’ve been our team’s stream guy for most of Assorted Meeples’ existence, so it makes the most sense that I’d be the one most likely to explore Twitch. I’ve met some amazing people digitally and in person as a result, but I got exposed to Link to the Past randomizers when I discovered another new streamer by the name of CrumblyGordon.
He was also new to these randomized Link to the Past games, and I found myself eagerly awaiting his next stream when one finished. As a retro and indie gamer myself, this not only meshed with my favorite types of games, it breathed new life and replay value into a forgotten classic I’d played and beaten many times.
Through Crumbly, I met streamers with similar interests, including Lanabean, legendarymoon, and attack_slug1, and I decided to start the journey of learning how to play the A Link to the Past Randomizer after watching their excellent streams (Seriously, go follow all these awesome streamers).
Now with nearly 100 completed randos under my belt, I’m here to help you start playing and/or streaming your own A Link to the Past randomizers with a guide I wish was around when I started learning the ropes.
What Is The Legend of Zelda: A Link to the Past Randomizer?
The typical A Link to the Past Randomizer (ALttPR), changes the item, crystal, and pendant locations in the game, leaving all keys, maps, and compasses shuffled within their respective dungeons. Each randomized game, or seed, is always designed to be beatable.
This means you could get something as useful as the Hookshot in the first chest in your house. You could be lucky enough to have Turtle Rock be assigned a pendant, allowing you to skip it since only the 7 crystals are needed to face Ganon.
Or you could go without a sword for over an hour. Ask me how I know.
Your goal is usually to get the fastest time possible – either by shooting for a personal best (PB), or winning a race amongst friends or members of the ALttPR community playing the same seed.
How Do You Play an ALttP Randomizer?
The ALttPR website has a nice, simple guide that basically breaks the process down into 3 steps:
- Locate a Zelda no Densetsu: Kamigami no Triforce v1.0 ROM. You can confirm whether yours is compatible here.
- Generate a randomized game by uploading your ROM, then select your randomizer game settings.
- Locate a means to play your ROM. I use and recommend Snes9x-rr 1.6, but you can also load these up on a flash cart like an Everdrive and play on a Super Nintendo (SNES).
NOTE: I do not recommend the vanilla version of Snes9x 1.6, as it does NOT support Lua scripting (which is used for auto tracking).
If you run into trouble locating a base Zelda no Densetsu: Kamigami no Triforce v1.0 ROM or get stuck as you’re learning the ropes, the ALttPR website also has links to their Discord and some helpful tips you wouldn’t necessarily think of if you’re used to playing the original game.
You also don’t need to worry about not being able to read your original ROM if you can’t read Japanese – when generating your randomized game, the text will be changed to English. From there, the best advice I can offer newcomers is to just start playing!
What are the Link to the Past Randomizer Game Types?
There are quite a few of these that exist for ALttPR tournaments and special occasions that you can find in the ALttPR Discord, but several are available all the time, and can give you a lot of different challenges and gameplay experiences.
Default
The typical randomizer experience, featuring item placements that are accessible without glitches, but require you to be a skilled fighter and know the ins and outs of A Link to the Past. Your goal, as in the core game, is to collect all 7 crystals, clear Ganon’s Tower, and defeat Ganon, frequently making the completion of dungeons with pendants optional.
There is also a Beginner version, which is designed to be more newbie-friendly with less required in-depth knowledge, more accessible swords and armor, and overall more straightforward progression, and a Tournament version, which uses a restricted item pool and turns off hints.
Overworld Glitches (OWG)
OWG is similar to a Default seed, but with a couple key differences. You’re allowed to skip Ganon’s Tower when Ganon is vulnerable (though you must still collect the 7 crystals), and the randomized item placement expects you to have knowledge of Overworld Glitches to successfully complete the game.
Crosskeys
Crosskeys is not for the faint of heart. In addition to the default rules, Crosskeys introduces Keysanity, a setting that fully randomizes dungeon maps, compasses, and keys throughout the world without confining them to their respective dungeons.
Further, all building, cave, and dungeons entrances are randomized.
Yes, this does mean a Light World entrance might lead you to a Dark World exit. Yes, this will suck if you don’t have the Moon Pearl. Yes, you may still have to navigate the Dark World while helpless to find the entryway you need to progress.
Like I said, not for the faint of heart.
It’s common practice to take copious notes during a Crosskeys seed, either through your tracker, a piece of paper, or an Excel spreadsheet, as not doing so will often leave you wondering where that entrance you found early, and now need, was an hour or two in.
You don’t have to go through this work if you don’t want to though – I haven’t for any Crosskeys seeds that I’ve completed to date. That said, I’ve added as much as 2 hours to a run by being lazy, so unless you have a photographic memory, following my example probably isn’t the play.
Super Quick
Basic item placement, immediate access to Ganon’s Tower, and a vulnerable Ganon from the word go. Try your luck with just the Master Sword or explore a little further to find some Silver Arrows and you’ll have saved Hyrule in no time.
Nightmare
The hardest among the prebuilt A Link to the Past randomizers, Nightmare mode mercilessly shuffles items, bosses, entrances, enemies, enemy damage, and even the Light and Dark World gameplay through use of the Inverted game setting.
Your item pool is also heavily restricted to an expert set and functionality, leaving you just enough tools to survive the experience. You’ll want to familiarize yourself with these if you’re not used to Nightmare seeds.
Master Sword Pedestal
A custom game type that only requires you to collect the 3 pendants, then pull the Master Sword from the pedestal to win!
Triforce Hunt
Also known as the Dorito Hunt, this custom game type replaces 30 of the less important randomized items throughout Hyrule with pieces of the Triforce. Collect at least 20, then talk to the sage outside of Hyrule Castle’s front door to win.
This is a casual favorite in my circles, and one I’d highly recommend if you’re looking for a more laid back ALttPR experience.
What Can You Customize in an ALttP Randomizer?
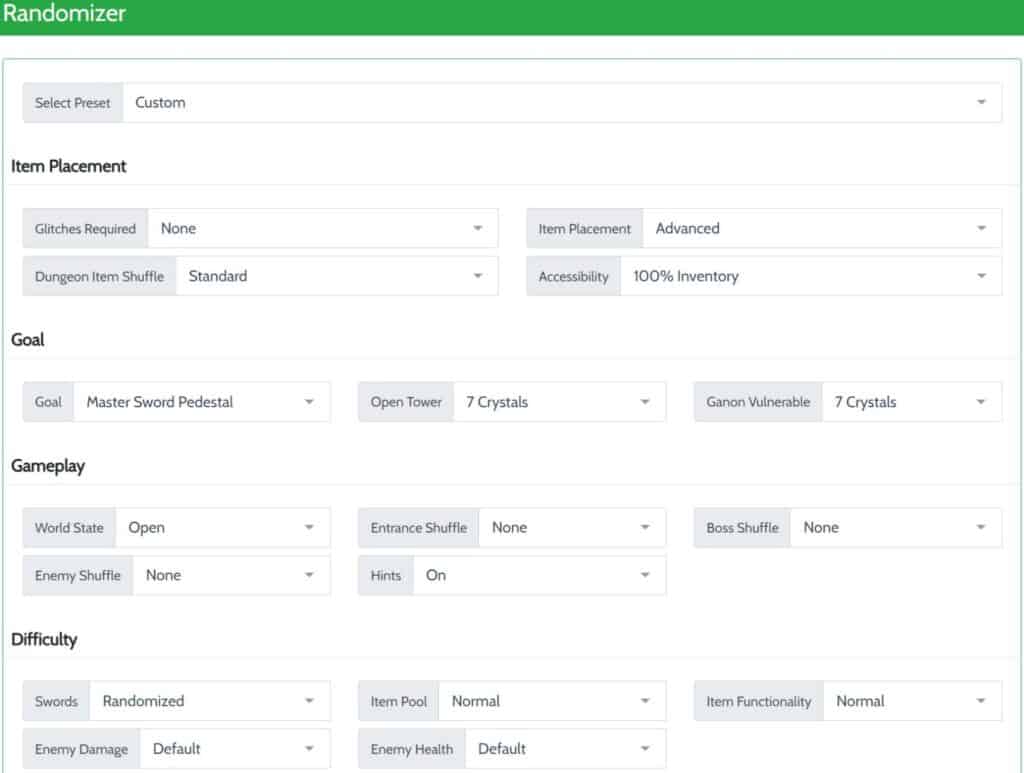
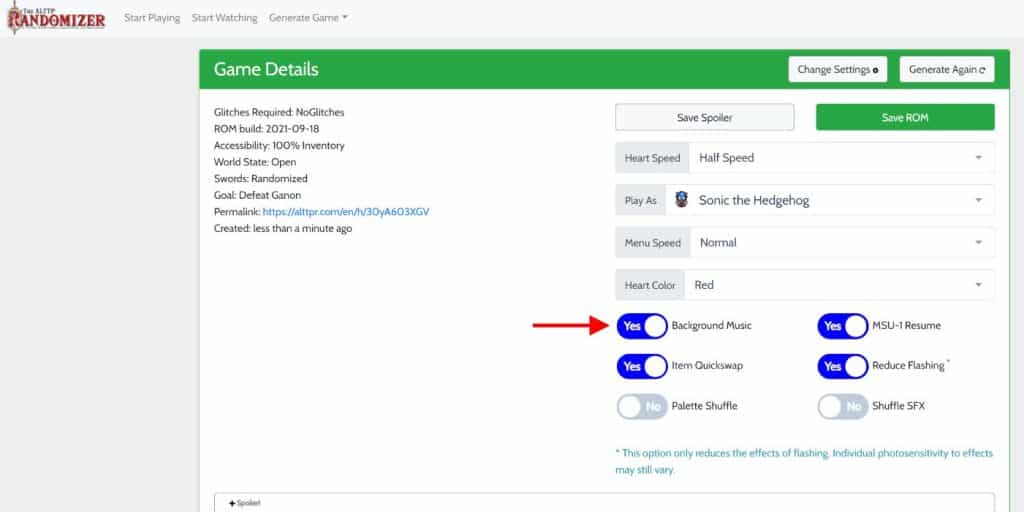
A randomized Link to the Past game can change a lot of gameplay elements, depending on what version of the randomizer you are playing. Pictured are all the A Link to the Past gameplay settings you can customize for a custom game type, including everything from hints to completion goals.
A full list of setting explanations is also available on the ALttPR website.
Once you’ve determined the settings for your seed, you can choose to customize the following elements before downloading it:
- Heart Speed
- Character Sprite (there are a LOT of these to choose from!)
- Menu Speed
- Heart Color
- Whether or not Background Music is on (leave this on if you intend to listen to the in-game music or are using an MSU).
- Item Quickswap (this allows you to switch between items using your controller’s L and R buttons – I highly recommend this)
- Color Palette Shuffle
- MSU-1 Resume
- Reduced Flashing (most notable with the Ether Medallion, I recommend enabling this if you dislike or are sensitive to rapidly flashing lights)
- Sound effect shuffle
How to Set Up a Link to the Past Randomizer Tracker
A good tracker is INVALUABLE as you’re starting out, particularly if you have a second computer monitor, as it can tell you what you have, where you’ve been, and most importantly, where you can go at a glance. There are multiple tools available to track your progress, but I personally use EmoTracker, so that’s what this guide will cover.
NOTE: EmoTracker is designed for Windows. If you use a different operating system, try this web-based tracker instead.
Once you’ve installed EmoTracker, open it and click on the Package Manager icon in the upper right corner (it looks like a cloud with a downward arrow). This will show you the different tracker options you can install within EmoTracker. If you’re just starting out, you’ll usually want to begin with the EmoTracker Official ALTTP Support package.
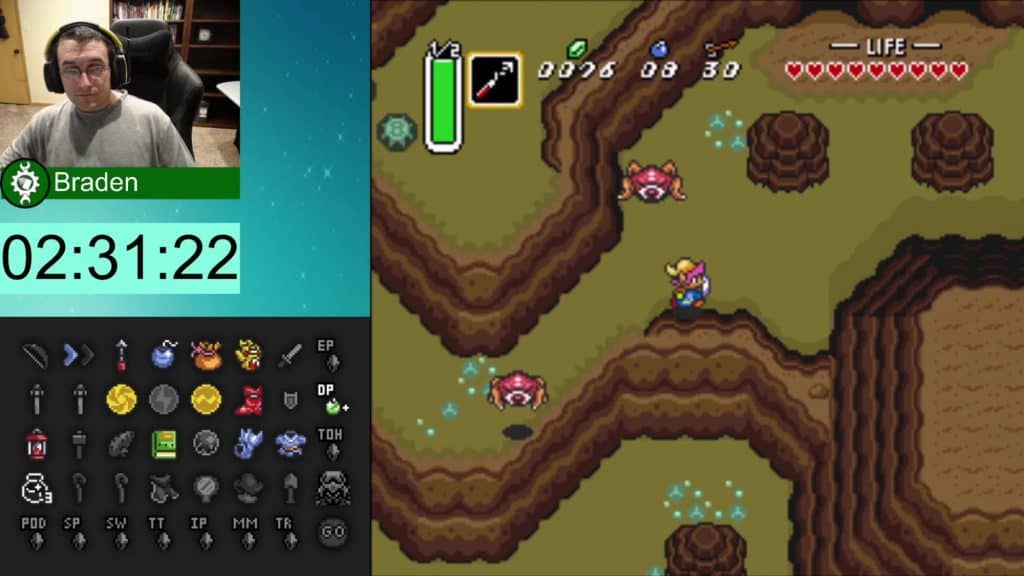
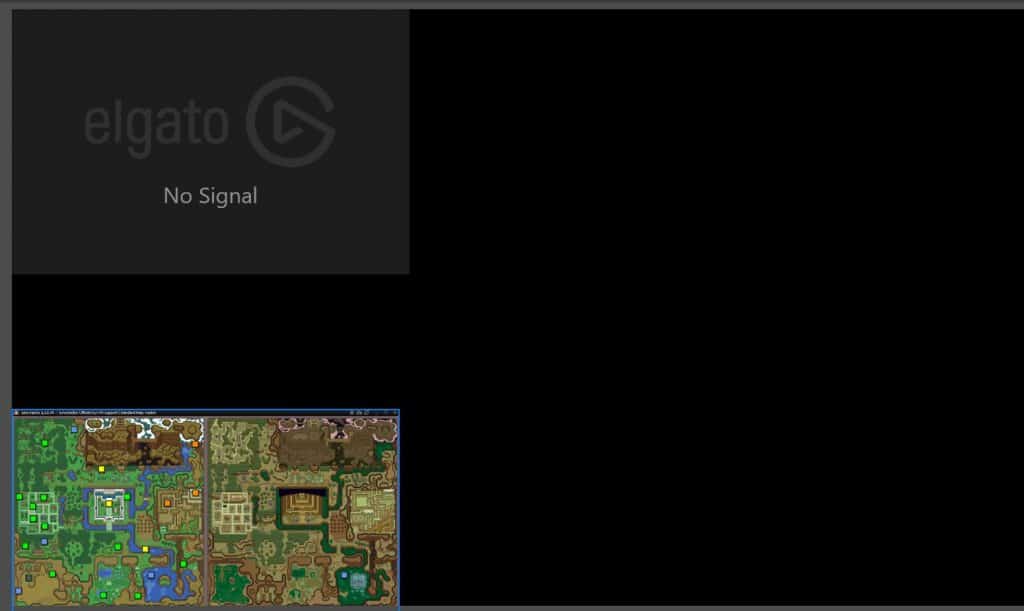
Once completed, you should have a screen that looks like this:
When reading the map, here are what the different colored boxes mean:
- Green: You can collect all items in this location with your current equipment
- Orange: You can collect some items in this location with your current equipment
- Yellow: You can collect items in this location with allowed glitches or sequence breaks (fake flippers, Herapot, etc.)
- Blue: You can see the location’s item, but are unable to collect it
- Red: The location’s item is completely inaccessible (this normally won’t show in standard, normal difficulty ALttPR seeds)
- Gray: The location’s items have been collected (this normally won’t show in standard, normal difficulty ALttPR seeds)
But what good is a tracker without knowing how to use it? Fortunately, all your controls are available through your left and right mouse buttons:
- If you hold the left mouse button on a box within the map, it will tell you the name of the location and how many chests it has.
- Moving your cursor over the gray box that pops up before letting go of the left mouse button will allow you to make notes for or pin locations at the bottom of EmoTracker.
- If you left-click an item in the lower corner (left by default), it will light up to indicate you have it, and update your map accordingly.
- If you right-click certain items in the lower left corner, such as the medallions, sword, or crystals, you can update the details for that item.
- For tiered items like swords and armor, this upgrades them, while left click downgrades.
- For items like the crystals or medallions, you can cycle through details like which dungeons they open or what type of item it is.
- For items like the bombs or mushroom, this can signify whether you’ve completed a related check like the super bombs or the witch’s shop.
- If you right-click a box on the map, it disappears, indicating you’ve checked it. NOTE: The Undo command (CTRL + Z) is the only way to bring these back.
Now, if you’re comfortable manually updating your tracker as you play, you’re all set. But who wants to go through all that extra work? Fortunately, there is a better way.
How Do You Use EmoTracker Auto Tracker?
The answer to this question will depend on what you’re using to play. This guide assumes you’re using 1 of the following common methods:
If you are using Bizhawk or the original SD2SNES to auto track instead, EmoTracker also has a setup guide for these methods available for your use.
Snes9x-rr
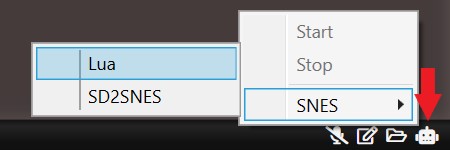
Configuring an auto tracker with Snes9x-rr is a two-step process. First, in EmoTracker, right-click on the friendly robot in the lower right corner, choose SNES from the menu, then Lua.
After that, open your randomized game in Snes9x-rr. Go to File, then Lua Scripting, then New Lua Script Window. You’ll get a pop-up window that looks like this:

Click “Browse” in this new window, then you’ll need to track down where your EmoTracker installation is. For my Windows 10 Installation, it is in Local Disk (C:), then Program Files (x86). Once you’re in the EmoTracker folder, go to Connectors, then snes9x, and finally choose connector.lua.
If all has worked correctly, the robot in EmoTracker should be colored cyan, and your pop-up window should look something like this:
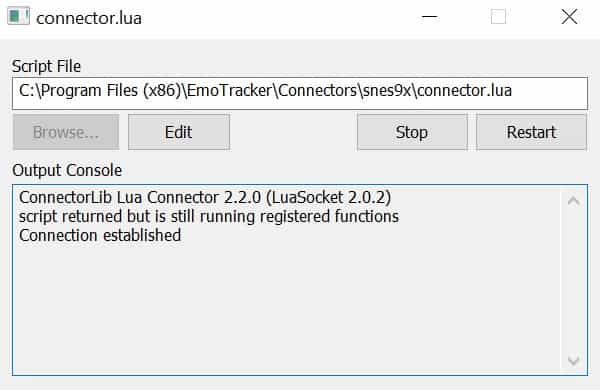
If the robot is yellow or red, or you get an error in your popup, additional troubleshooting may be required. Verify that you’re using version 1.6 of Snes9x-rr, as earlier versions could create avoidable issues. If you aren’t seeing the Lua scripting option at all, make sure you’re using the Snes9x-rr fork, as regular Snes9x does not support Lua scripting at all.
Usb2Snes
If you haven’t gotten your flash cart or Usb2Snes set up yet, start by reading Lanabean’s excellent guide.
A huge thanks to Lana for the below pictures showing how to connect EmoTracker to a flash cart using a Usb2Snes setup as well!
First, make sure your flash cart with Usb2Snes is connected to your PC via USB. Your SNES must be on for it to show as connected to your computer.
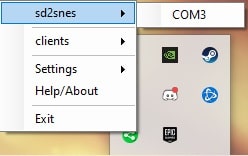
Next, go into EmoTracker, right-click the friendly robot in the lower-right corner, then choose SD2SNES.
Finally, the robot should turn cyan, and you should be ready to play your ALttPR seed!
What Does the EmoTracker Auto Tracker Do?
The auto tracker will update major items you’ve collected and remove item checks you’ve made from the map, with the exception of dungeons. You’ll still need to keep track of these yourself to ensure all possible items have been retrieved.
For reference, here are the number of item checks you will find within each dungeon (not counting keys, compasses, or maps):
- Escape: 6 (This includes the chest in the Sanctuary, but not the items from your uncle or the chest found next to him.)
- Eastern Palace: 3
- Desert Palace: 2
- Tower of Hera: 2
- Castle Tower: 0
- Palace of Darkness (Dark Palace): 5
- Swamp Palace: 6
- Skull Woods: 2
- Thieves Town: 4
- Ice Palace: 3
- Misery Mire: 2
- Turtle Rock: 5
- Ganon’s Tower: 20
What are ALttPR MSU Packs?
MSU packs are soundtracks that are designed to replace the standard music of A Link to the Past. I use these all the time when I stream because it lets me listen to some of my favorite video game music and keep things fresh for my Twitch viewers.
The setup is also surprisingly easy! First, before downloading your randomized seed, make sure the Background Music is set to “Yes”.
Next, download the MSU you would like to use. A handy spreadsheet of options put together by the ALttPR community is available here.
Unzip the files to their own folder, then move your randomized seed to the same folder. Finally, rename your seed’s file name to match the prefix of the MSU sound files. See below for an example:
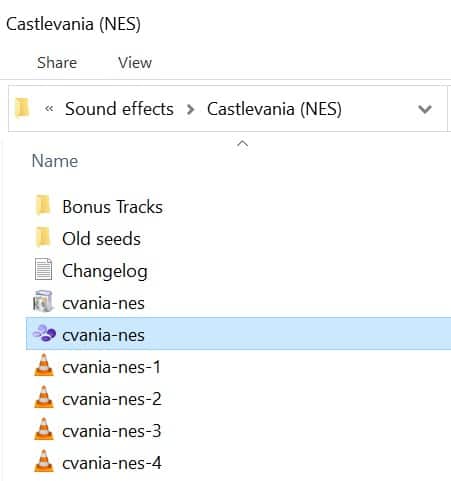
Now just open your game, and you should hear a new track playing on the title screen!
While you might come across the occasional sound glitch, I’ve personally only ever had or seen it happen 3 times in the last year, which is an amazing track record considering the sheer number of MSU options. Before you know it, you’ll have a list of favorites to rotate through!
How Do You Stream ALttPR Games in OBS Studio?
Streaming a randomized ALttPR seed is going to be very similar to streaming any other game from an emulator or flash cart. That said, the following items are pieces of information you may want to add to your overlay so viewers have a good understanding of how you’re doing and where you are in your run:
- Item tracker
- Map tracker
- MSU information (this can just be a line of text)
- PB information (this can also be a line of text)
- Timer
While text is pretty easy to add in OBS Studio (choose your Scene, add a source, select Text, then place it where you like), the other 3 items can be trickier to add and/or have quirks to watch out for, so we’ll cover those in a little more detail.
Let’s start with the Item Tracker. To bring up a window that just has your items in EmoTracker, simply press F2 on your keyboard. If you’re using the EmoTracker Official ALTTP Support package, it’ll look like this:
NOTE: This window cannot be minimized if you want it to update during your stream.
From there, add a Window Capture source in OBS Studio, and select [EmoTracker.exe]: EmoTracker: Broadcast View. NOTE: You will need to reselect this option from the dropdown each time you reopen OBS Studio.
Next is the Map Tracker. This one is likely to be the most annoying if you use EmoTracker, as it is best done as a Window Capture source, complete with the lower section for items and pins.
While I personally don’t include the map in my streams, my recommendation for using it is to resize your window to minimize empty space, the place it in your overlay so that the item portion is simply cut off.
Finally, we come to the timer. I’m going to cover a couple options for you here – Snaz and LiveSplit.
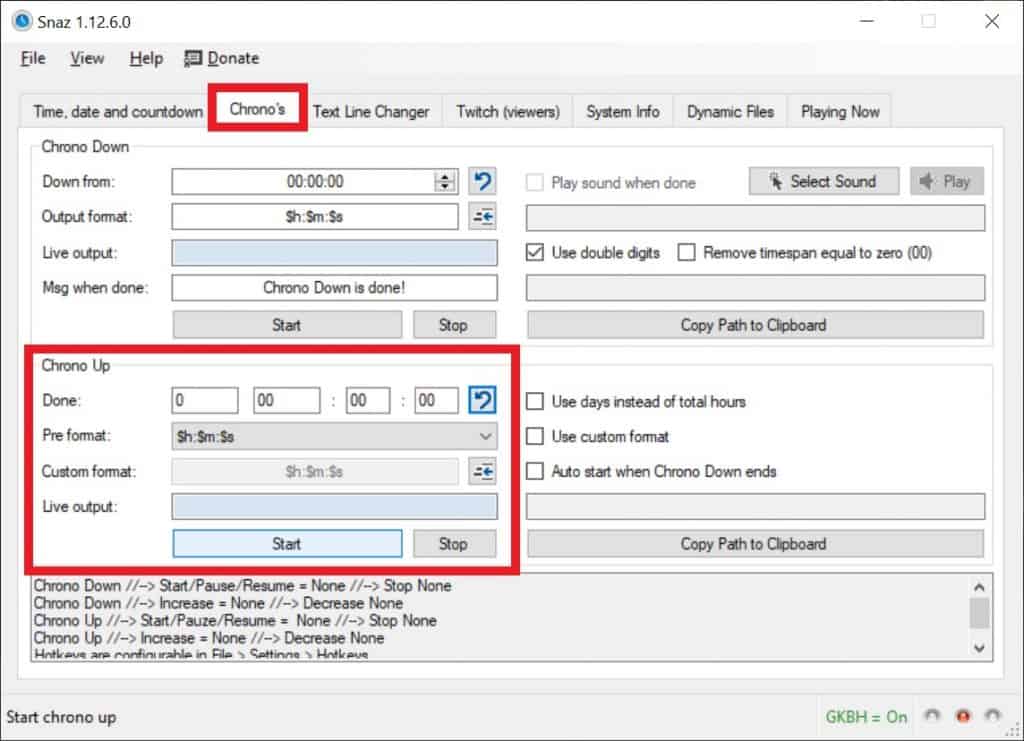
Snaz is my program of choice for ALttPR, and it’s a little tricky to set up if you don’t know what to look for.
NOTE: Make sure you install version 1.12.6.0 – later versions are documented to say they’ve ended Twitch support.
To add your timer to OBS, add a Text source, then browse to Snaz’s ChronoUp.txt file. See below for an example of its location on my computer.

Once you’re ready to start your timer, just open Snaz, head to Chrono’s, then start the Chrono Up timer!
If you’re looking for a more customizable timer system that accommodates competitive speedrunning and milestone tracking for a wide variety of games, LiveSplit is an alternative to Snaz that is very, very popular with streamers. It can also be conveniently added to OBS Studio via a Window Capture source.
Check out their introduction video below for a newbie-friendly setup guide!
ALttPR Tips and FAQs for Beginners
If you’ve read through this guide, you should have everything you need to dive in and start playing! Before wrapping this up, however, I wanted to take a moment to offer a few pieces of advice and answer a few questions that were glossed over earlier.
ALttPR Tips
- If you haven’t played through the base game in a while, play through that first. Doing so will give or restore basic familiarity with the game and its items, which will take the edge off some potentially daunting randomizer scenarios.
- Don’t feel obligated to finish a seed. It took me four tries to successfully complete my first ALttPR seed, and that run took me 8 hours.
- Learn how to route your first several checks. I’ve personally found it’s easiest to start with this route in most cases:
- Open the box in your house
- Go see your Uncle and open the chest near him, then Save and Quit to start in Sanctuary and open the Sanctuary chest
- Head north to the cave next to the Lumberjacks to see if an important item is on the ledge (if one is, you’ll need to plan for a visit to Agahnim)
- Head west from the Lumberjacks to the woods and collect the two items there
- Exit the woods from the south and continue to Kakariko Village for all those checks. Buy Bombs in the village if you fail to find any up to this point.
- Head south to check the library shelf and do the maze race
- Aim to consistently finish in under 3 hours. While experts routinely finish under 2 hours, they’ve got thorough knowledge of routing, glitches, and game mechanics built up from sheer experience. Take time to master the basics of dungeons and learn how to route efficiently, and once you’ve got those under your belt, grab a practice seed and start learning glitches and sequence breaks!
ALttPR FAQs
- Are there A Link to the Past randomizer hints? Several game modes use the hint tiles found in the vanilla game to provide you with hints about where items are located in your seed. If you’re setting up a custom game, you can also toggle these on or off.
- How many different game types are there? Tons! The ALttPR website does a great job of breaking down difficulty levels, game types, completion options, and more! Whether you’re playing with friends or by yourself, you’ll have plenty of choices for racing, cooperation, item placement, entrance placement, difficulty, and more!
- Is there A Link to the Past randomizer multiplayer? Yes! It’s called Multiworld, and you can learn how to set it up here.
- Does a custom sprite offer advantages or disadvantages? Generally, no. Some sprites aren’t humanoid shaped like Link’s sprite, which might throw you off at first when trying to dodge or swing a sword, but all sprites are created equal in terms of ability in my experience. You can find a full list of the A Link to the Past randomizer sprites here.
- Does a custom MSU offer advantages or disadvantages? Most times, no. MSUs can occasionally slow your time if a dungeon completion track is long, but you’ll be able to tell those apart pretty easily so you don’t accidentally use them in a race.
- Do I have to use EmoTracker to track my progress? Absolutely not! There are a lot of different trackers out there, so if EmoTracker isn’t doing it for you, a few minutes on Google or in the ALttPR Discord will certainly net you an alternative. EmoTracker also has other tracker packages for ALttPR, so feel free to check one of those out as well!
- Are there other randomizers besides A Link to the Past? Yes! EmoTracker even has support options for several of them. I myself am getting ready to start exploring Zelda 1’s randomizer, but there are lots of randomizers out there – definitely feel free to check out your options!
- Where can I learn more about glitches and sequence breaks? Check out this handy resource! While not comprehensive, this will give you a place to start that covers most of the important and commonly used shortcuts in the game!
- I’m constantly having trouble in “x” area – is there a way I can easily practice that section? A practice seed is just what you need! It will allow you to warp to virtually anywhere in the game with whatever items or settings you’d like!
Braden is a founder of Assorted Meeples and has been a gamer & writer with a vivid imagination all his life. Don’t believe us? Check out his excitement when meeting Goosebumps author R.L. Stine as a kid! An avid Magic: The Gathering spellslinger for over 15 years, you can always convince him to shuffle up for a game (or three!) of Commander.