
Settlers of Catan is one of those amazing strategy games out there that has a huge array of fans across a wide array of gaming niches. In fact, it’s probably pretty safe to say that Settlers is probably one of the most popular and widely loved board games out there, no matter what your normal gaming preference is.
The game has strategy, it has trading and player interaction, and it has dice luck. However, the best die numbers for you changes because the exact placement of number tokens, settlements, and resources all change from game to game. This means that a strategy game that is relatively simple to learn and understand can provide nearly endless replay value.
Luck matters, but if you don’t use good strategy, especially with picking your beginning settlement spots,
Placing your settlements in Settlers of Catan like a pro involves seeing the board, likely resource scarcity, and potential open areas and combining them into one of four main in-game strategies. While optimal beginning game placement of your settlements doesn’t guarantee victory it does help push the scales in your favor.
While every single board is going to be different, understanding the best strategies to early setup can drastically increase your chances of winning while ignoring these strategies can keep you in the loser’s circle.
The TL;DR Catan Settlement Placement Strategy Video
That Settlers of Catan strategy video will teach you all you need to know about getting the most out of your settlement placement.
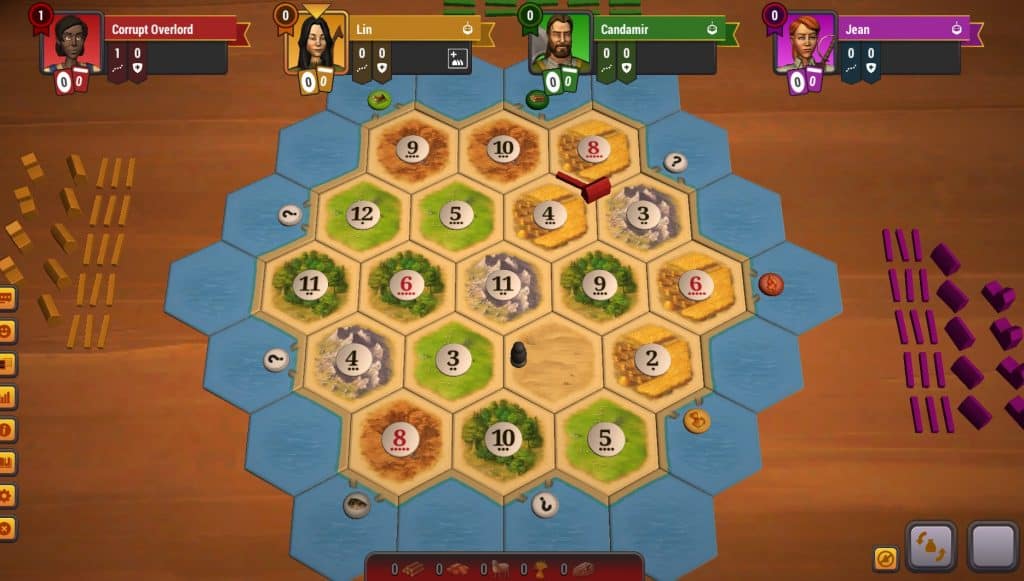
All Resource Access aka Beginner Strategy
This is a decent strategy. It’s not overly tricky or strong, it gives the player a chance to get everything they need at some point during the game, but it is also one that is often very vulnerable against experienced Catan players. There are a few reasons for this.
One is that you are virtually never going to have a good number on all five resources. This means you’re going to be short on one or two, and if you don’t plan your strategy around those moments you might run into multiple times where everything comes to a screeching halt if you can’t get a good trade because you’re at a choke point.
This tends to especially happen with stone, which is a heavy city resource so it doesn’t feel as important early on, but if you can’t upgrade to cities then you are going to be hard-pressed to compete with any other players at the table.
Another downside is that you may have to settle for multiple “okay” numbers to cover all the resources instead of doubling down on two really good numbers. There is a degree of dice rolling and luck so sometimes this will actually work out really well for you, but sometimes it won’t. There’s definitely a gambler’s choice issue there.
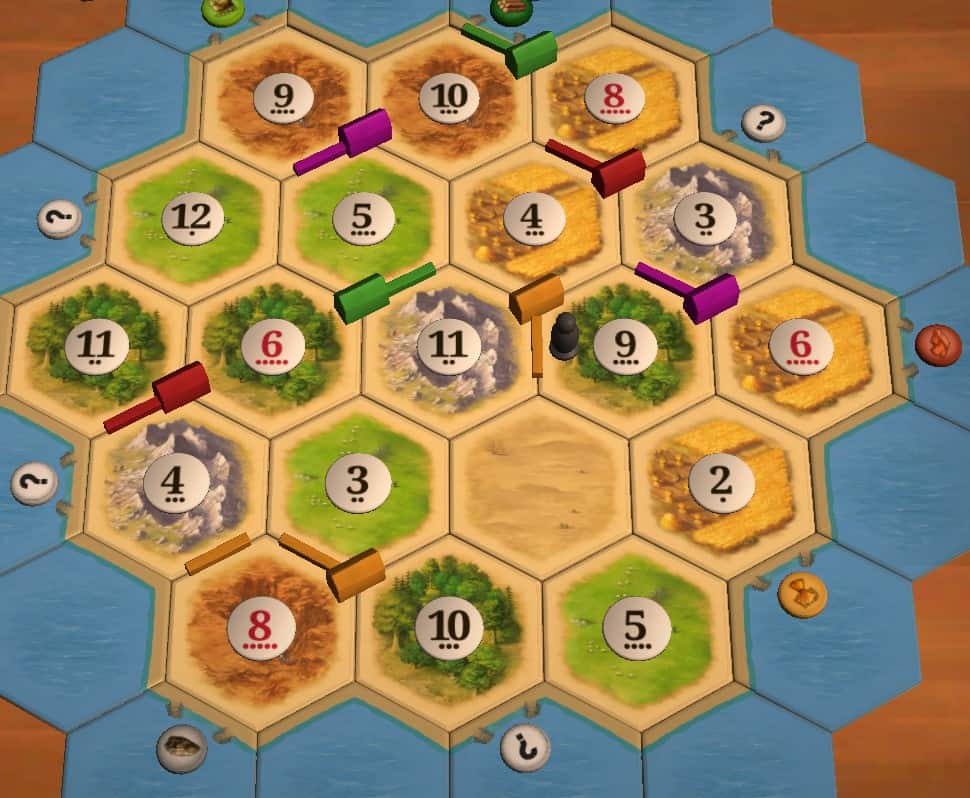
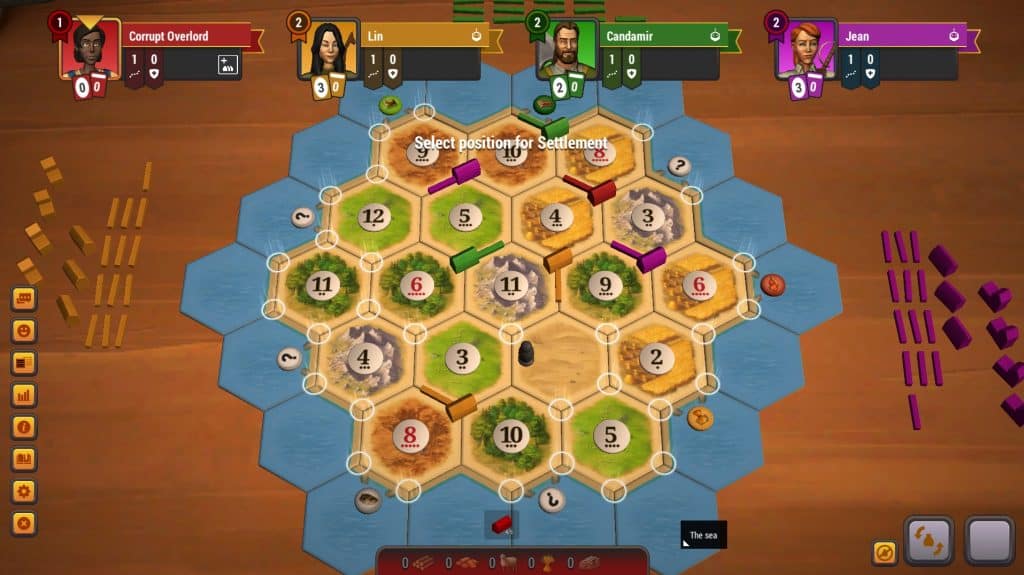
My settlements are in red. Here I have access to all 5 resources on the board. That’s the good news. However, the 3 brick is pretty weak and one settlement has no access to an 8 or 6, which is okay considering the 5-4 combo, but if I fall behind on road building this game it can go bad very, very quickly!
If you are a true beginner this actually isn’t a bad strategy because it at least gives you a chance to get what you need while also learning the ins and outs of various playing styles and game strategies.
You probably won’t rack up a lot of early wins, but if nothing else is available this can be a viable strategy and it’s a great setup for learning the game.
If you have the rare board where a couple players go the specialized harbor route and you have the ability to get a good number on every single resource, then by all means, go for it!
The Road Building Placements
Roads don’t matter much at all in the late game, but in the early game they often quickly separate contenders from pretenders. Especially in four player games there are very limited spaces to expand. By starting with a road, or with the lion’s share of the resources that make up roads, you put yourself in a strong position to expand and get an early advantage.
In the beginning of the game bricks and trees are two of the most important resources. You need those for roads to race out to prime leftover settlement locations, useful harbors, or to block off longest road attempts from other players (and maybe claim your own!) You also need these two resources to build actual towns.
Later in the game they’re not worth much at all unless you have a harbor. That said, if you race out to place two settlements, one in a good overall spot and one at a killer harbor, then getting to those spots early makes it worth the sacrifice.
Setting yourself up to start with a road, create products to mass produce roads, or both, can be a powerful strategy, especially if the early rolls get you to a good harbor spot or to place a new settlement that will help you pick up the resources, that can be worth it.
Especially if the third settlement ends up getting the resources for cities, for victory cards, or even doubling up on resources before grabbing a harbor.
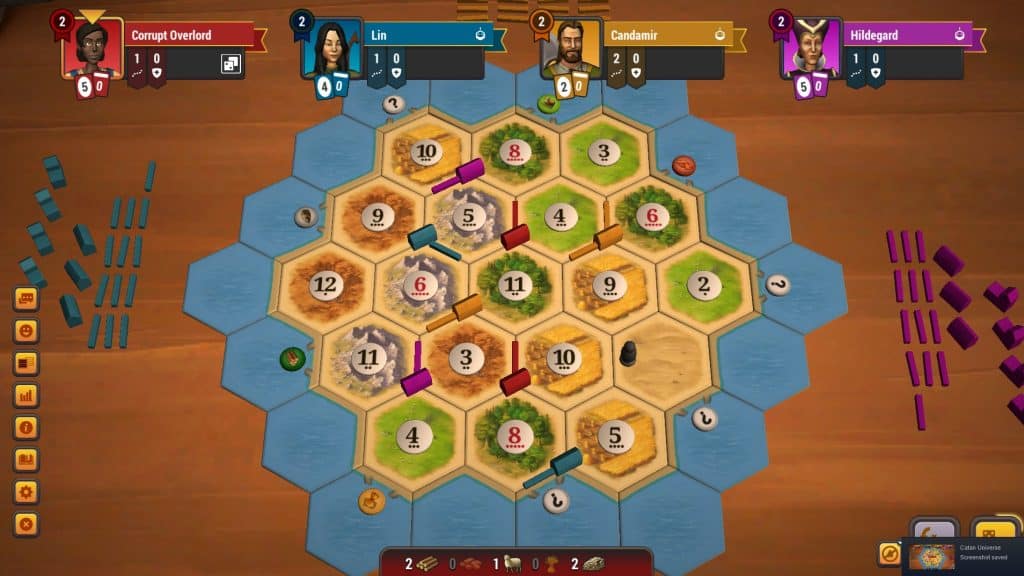
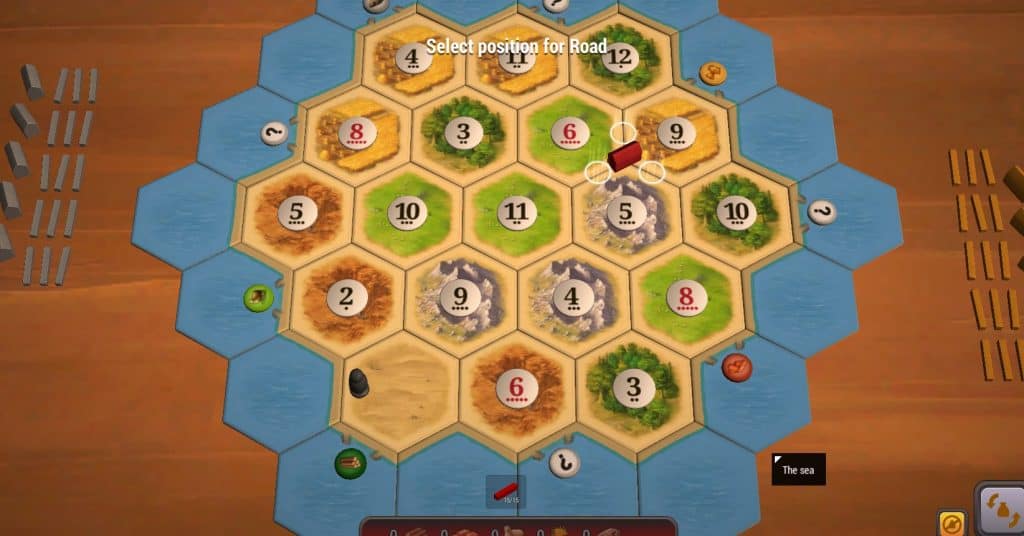
In this case we’re looking at Orange. Red went heavy for the city strategy, purple went for strategy, and green is just a harbor grabbing jerk. Orange placed the bottom settlement last, getting a brick, sheep, and wood to start.
On his turn, he immediately built a road towards the coast and is now set up for a town on the 8 brick/4 stone which would set him up great for a three settlement start.
Road placement is admittedly less important late game, and beware because there is NO card that paints a bigger target on your back than “Longest Road,” but if a big boost early there gets you a third settlement or a key harbor then chances are you are WAY ahead of the curve and can put yourself in a very strong position when done right.
Especially when that sprinted to settlement cuts off an opponent, too!
Keep in mind the players around you with this strategy. Especially when placing roads. If you place early and there are some really good spots to the side – what are the chances those are open by the time you get to place your second settlement?
In many cases it makes sense to place an opening road towards more moderate spaces as opposed to the best case scenario you’re hoping for. That way when the game starts and you have a road you can one build to an open spot…instead of seeing opposing settlements right in front of both your placed roads.
If you have to two build to a spot, the early road building strategy is way less effective.
If it only takes one more road to get to even a moderately okay open spot early so you can build ahead of everyone else, that’s a really potentially huge advantage.
Road Building Placement
- Secure high quality numbers on brick and timber
- Secure a killer settlement on a super strong double timber or double brick location with good numbers AND secure a harbor (easiest to guarantee from 4th position in a full game)
- With this start take a look at locations you’re likely to be able to sprint to in order to build a settlement
- Since you will likely be short a resource (probably a city resource) make sure to plan at least a 3:1 harbor to run to
Looking at red: Why go the direction that actually seems weakest? Since he placed first he knew almost all good spots on the board would be taken. Going towards the coast means there’s virtually no chance of him getting blocked.
If someone does they really waste a settlement space. But both harbors could be useful, as is doubling up on the 8 or 5. This means the first road isn’t wasted, it’s protected.
Defending your first road is very important concept. While this setting isn’t going for an early road, it is road-related so I put it here. If you place settlements first, it’s doubly important to look for good spots where you have any chance at all of actually defending it.
In this game opponent settlements were eventually placed in literally every direction surrounding the first red settlement.
If the road had gone in any other direction, it would have been worthless. Every potential direction was blocked.
So what looked like a weird mood to novice players at first glance ended up protecting the first road and gave the player more options when new settlement areas became scarce.
City Planning Setup
Look, if you hit a city (or two) before anyone else, the rest of the board is in serious trouble. Every experienced Settlers player pays special attention to the stone and wheat resources for a reason. The sooner you can double those resources, the quicker you can spiral the game out of control.
Not every board will have an obvious “Build a city” space. Often times you’ll be very strong in either stone or wheat and just so-so on the other one. However, a couple early lucky rolls give you cities.
Not only does that double resources fast for more cities, but any random other resource you border will give you double – meaning even the low producing numbers or resources you border give you more when they do come up.
That means you’re sacrificing early road building to city up, so you want stone and wheat. Because at least one, if not multiple, players are going to dive for wood and brick, this often ends up being an intrigue card game, as well, as sheep will often be the one readily available resource open to you with a good spot by the time you pick again.
In a dream world after that first placement one of the 11 stone – 4 wheat but in no game with good players would that EVER be an option. Spots I’d keep an eye on after the rest of the settlements were placed (in order) would be:
- 6 wheat 3 stone on the coat if I wanted to go all in on the city build
- Any placement off the 4 stone that looks decent (especially if 4 stone – 11 wood on the harbor is open)
- A 6/11 wood spot assuming I could hit the wood harbor at top to make up for the lack of other starting resources
- 6 wheat 2 wheat on the coast if someone settled the 9 wood/3 stone/6 wheat instead of 9 wood/6 wheat/2 wheat
- 2 wheat 5 sheep on the coastal wheat harbor
This is assuming you’re playing good experienced players. There are better high producing spots on the board but NONE of them should be open at this point. Chances are by the time you place the last starting settlement several of those bullet point spots will be gone, as well.
This isn’t an ideal board for a city run as you’d like to see a better number on the stone (a 5 there would have been killer) but if you’re running it on this board that’s how you’d do it.
The options above for the second settlement either supercharge your city building materials, give decent numbers for resources you don’t have a lot of, and take advantage of harbors to let you convert excess resources into badly needed roads, settlement resources, or even development cards.
Development Card Game
Development cards can be frustrating – especially if you get six knights in a row while every other player grabs just 1-2 cards and gets monopolies, free resources, and victory points. That being said, development cards are incredibly powerful.
Especially since going hard into a development card game means you should have plenty of wheat and stone. That means more cities, which leads to even more wheat and stone, and so on.
When there’s a great starting spot for the development card game this is a great strategy. You push towards upgrading to cities early, you are very likely to get a big jump on the 2 point bonus for biggest army bonus, and the deck gives the all-powerful two monopoly cards, a double road card that can lead to some crazy sneaky plays, free resources, and even straight up victory points.
It’s a very good strategy and one that usually gives one very powerful spot and a lot of flexibility for placing the second.
On some boards you’ll be able to get sneaky with it – grabbing something like a good wheat and sheep on one side (with maybe a low number rock) and then a good rock and sheep on the other side (maybe with a low number wheat).
This can be especially effective when you cobble it together from two settlements because that usually means you have at least some access to some other resources and the ability to expand.
That board is an example of a monster starting point. It won’t always be obvious. This is a really good board with multiple two stone, two sheep, and two wheat spots that give you a chance to use two settlements for strong results.
Pro Tip: Longest Road is easy to see, and becomes very competitive, very fast. Largest Army is the MUCH better bonus card to get. The point bonus is the same as longest road, the only way to take it from a player is to also play the development card game (resource production and “build two roads” cards don’t help)
And getting four knights from scratch after someone already has three…it has happened probably, but you can play hundreds of games and never see this.
Horde the Rare Resource
On some boards there won’t be enough great positions to go around but it will be obvious that one resource will be scarce. If the same resource has a 2 and 12, those remaining tiles with that resource will be in high demand.
On some boards it will be clear there is one, and only one, tile that is going to produce that resource most of the game.
If wheat on your board has a 2, 3, 12, and an 8, you definitely want to grab that 8 and close off as many other routes as possible. If you are the only provider of a resource that not only gives you a leg up by forcing others to use 4:1 bank trades or 3:1 harbor trades, but also makes it more likely for you to get overbalanced trades.
Those extra 2 for 1 trades could be the difference between victory and defeat by game’s end.
While there are certain resources that are clearly better for this strategy than others, don’t underestimating connecting this with a harbor or a really good secondary spot to make it work.
Even sheep are critical when everyone needs a town or a development card and there isn’t a ram or a lamb to be seen in turns!
This is an extreme example as it usually won’t be this obvious, but sometimes it is. At other times you may see a resource that has two 11’s, a three, and a five. That might be okay, but we’ve had plenty of games where the semi-rare 11’s or 3’s didn’t roll. In that case if you can flank the five with a settlement on each side a little luck gives you a chokehold.
You have to keep an open eye for this and then decide if it’s the best strategy or not based on the board you’re seeing.
Sometimes you may even stumble into this: having a really good placement on one side of a resource that happens to be potentially scarce, and then using this as a tie-breaker to take a settlement with slightly less potential but blocks off other players from the resource.
If you’re picking 4th and there isn’t an obvious harbor game this could be a great combo strategy for placing your starting Catan settlements!
All Hail the Harbor Game!
Braden likes to use this one to stunning and devastating effectiveness. Especially if you can manage to upgrade those settlements into cities when that number has been rolling like crazy. This is a strategy that is very high risk-high reward.
But man when it works it does have the potential to get out of control quickly.
An obvious con: If you gain any momentum you will have Knight cards played on you left and right, because it will be clear that one tile is super scary to everyone else at the table.
Now to be clear, this next one was a screenshot for teaching purposes. On this particular board I would NOT take this strategy. But the picture shows a VERY extreme example of how it would work.

Massive investment in the wheat numbers. While 4 is good and 11 is just okay, when you add that with an 8, and have the four doubled up, that is an insane amount of wheat that goes right to the harbor.
What would have been a better setup?
Two options here. First is having that 8 wheat/4 wheat/3 sheep town and move the harbor town to one of the four good open town locations around the 9 stone. Double up on stone, go hard towards development cards, or do a little bit of both while picking up some wood along the way.
With this strategy you would have the road pointing north. It’s not likely that someone grabs the wheat harbor (though it is possible) though you’re almost certainly fighting of an 11 wheat/6 sheep/3 sheep that will try to sprint for that harbor, as well. You need to win that race.
Second strategy is having the harbor city on the 11 wheat/6 sheep/3 sheep. If you can trade your way to a road or two (or get a lot of early rolls you need to bank) to grab the harbor it is costly early but can pay off.
Though if another player snipes the harbor you are screwed with that setup.
I’ve seen harbor setups work extremely well. If there’s a resource with a decent number by a harbor of the same resource, most of us block it because too many times Braden grabs the harbor and snakes three settlements around that one, city them up (thanks to the harbor) and then rolls the table.
Keep an eye out. This won’t be available with every board setup but when it is there is serious potential.
As Many Numbers As Possible
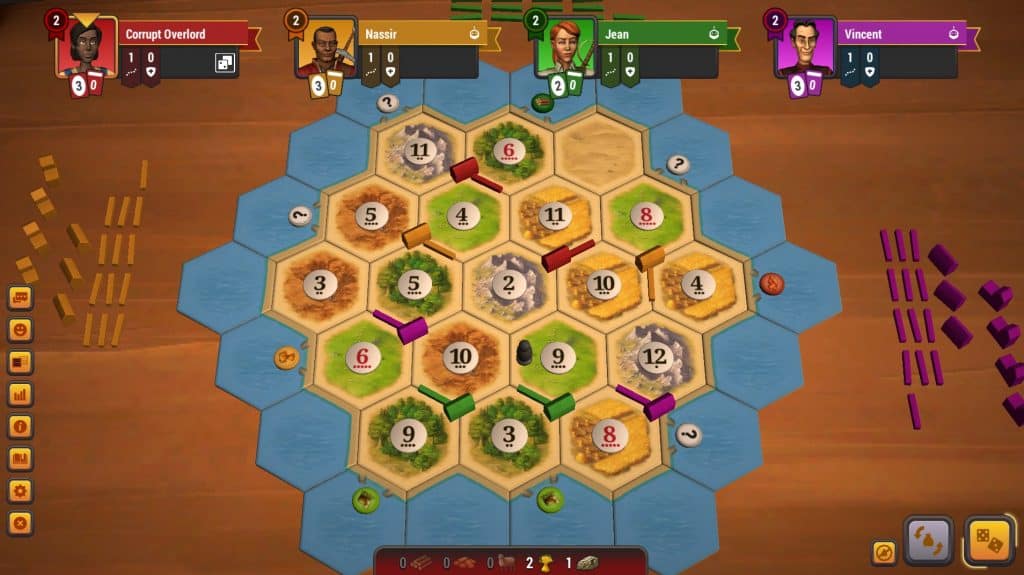
This is playing the odds that numbers will generally be widely spread out and not go heavy into just one or two numbers…or by having as many numbers as possible you will actually be more likely to hit on those streaks, as well. The many numbers as possible isn’t a bad strategy, but it has some flaws for those who adhere to it too religiously.
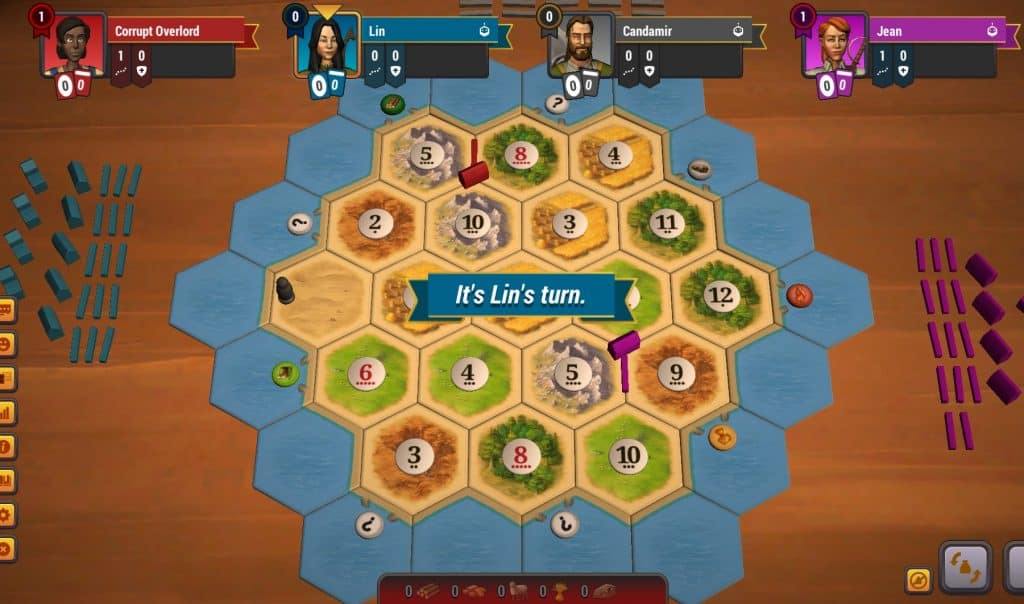
This game shows that. Playing red, the first two settlements were the 5-9-10 and the second was the 3-6. This was a combination of harbor and full number spread strategy. The next town hooked up a 4 which meant any 3, 4, 5, 6, 9, 10 would get something. Take away the rare 2 and 12, and the 7 because it’s the robber, and out of 9 remaining numbers 6 give me something.
That’s a 67% chance of something. And I did start rolling and almost win this game until the most two unlikely rounds of rolling in history (4 2’s, 2 11’s, and 2 12’s in the last eight rolls, 2 robbers that pulled the perfect resource she was missing, and stupid AI’s trading with purple allowed her to go from 5 points to 10 in two rounds because Catan Universe on Steam is 100% f’ing stupid if you’re playing vs AI instead of players but that’s a rant for a future episode) threw a wrench in those plans.
But in this case this is a great example of not only having multiple numbers but also the separate harbor. Settlement 2 was on the wood harbor, while settlement one was the only one that collected any wood starting out. In a world where mathematical RNG really is randomly generated, it worked out quite well.
The main drawbacks are sometimes you are giving up a premium position or ignoring a good harbor or blocking opportunity chasing numbers. This isn’t always the case, but it’s careful to balance the sheer variety of numbers with actual opportunities the board is giving you.
Blocking Expansion Placements (aka Being a Jerk Catan Settlement Placement)
Generally you’re doing this to:
- Troll another player
- Block a player in a multi-player game running away with it
- As a tie breaker between two possible settlement points
If you ever watch money tournaments of Settlers of Catan you will notice that players do this all the time to one another. Preventing expansion may be a jerk move, but it’s a powerful strategy.
In those situations you need to learn to defend your first road, when to take a slightly “lesser” settlement to make it less appealing to block you, or to set up in a way that forces players trying to block you to commit to a “Boom or Bust” strategy they might be hesitant to actually commit to.
When you’re doing this, sometimes it will be just because there are limited good spaces and you need to take a spot their road is pointing towards. That’s on them for not protecting their road better. When the block makes sense strategically, you need to consider it. Especially if it works with your own strategy you already are setting up on the board.
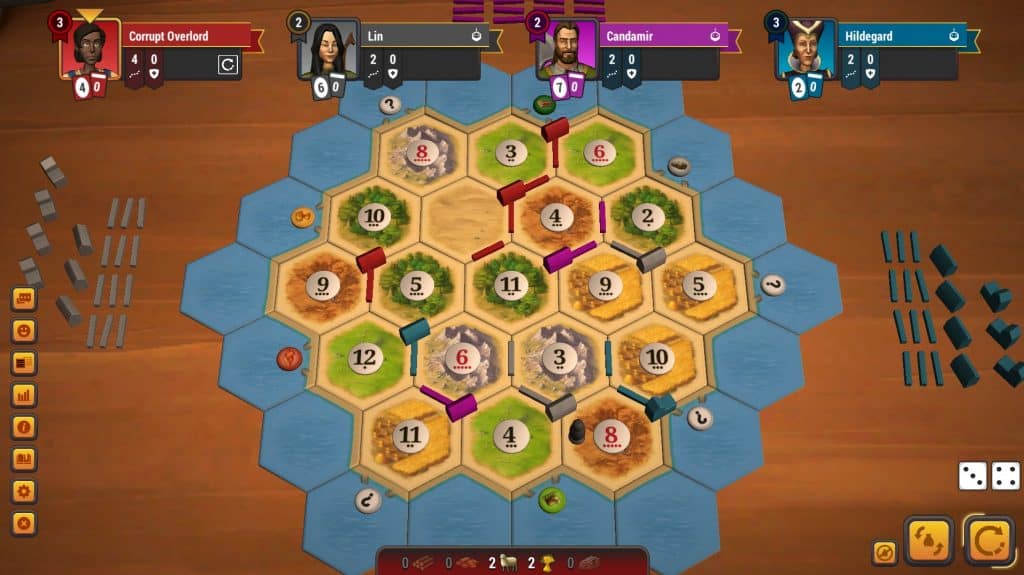
Here orange has a pretty expert (aka massive jerk) block on both green and purple with that 11 stone – 4 wheat – 9 wood placement. And that’s just a really good spot, too.
The fact the desert tile is straight south means there will almost certainly be room to build roads and expand, one direction or the other. Those might not be premium spots – but by late game none of the open spots are.
Position Matters When Placing Settlements
When you get to place your settlements matters a lot. Now, there’s the occasional dumpster fire board with 6’s and 8’s stuck on the corners on a resource across the board form a harbor with the desert in the middle. And one clear cut above the rest premium spot and everyone hopes they are player one in that case.
Usually though position 4 is the sweet spot because you get to pick both settlements at once. This means you KNOW all that’s available right then (though you have to make educated guesses on what the other players will block off after you) and can plan your entire game strategy with placing both settlements.
There are certain things you need to look for before placing settlements from that 4th spot position.
Important things to look for:
- Is there a good brick/wood spot left? Making that a second placement so you start with a potential road build is a very good strategy
- Is there a killer harbor setup with massive resources on one side of the board, and a harbor by another one of those resources on another? Place the harbor first, and then get two of that harbor’s resource with your across the board placement. Big flexibility from turn one
- Are there any resources you can help seal off? Any placements where taking a good settlement ruins three potential great ones for all other players?
- What are you going to be short on and how can you give yourself the best chance of overcoming it?
- Can you go strong development card through two settlement placements?
The ability to see the board at this point, and what other players may want to pair up with their first settlement, allows you to really plan out the best way to balance setting up your own early advantage strategy for the gameboard as well as where you may want to block off potential problems from other players.
If you’re in one of the medium two spots so you’re likely missing out on the premium spot and you don’t get to place two at once, take some educated guesses one what other players might do and just do your best to get good spots, and not have your roads cut off.
Placing Settlements In-Game
We’re not going to spend as much time on this topic, since this is going to be strongly dictated by the board of any given individual game. Once everyone has put down their settlements you can see not only which spots are open for expansion, but also what strategies are available to you, what harbors, what areas are likely to be grabbed for expansion, and what resources you can double down on (or need to desperately grab to avoid getting shut out completely).
Sometimes it’s obvious where you need to make a sprint for. Other times you might choose to look for a good Plan B.
Practice enough times and you begin to know what to look for especially if you tend to game with the same players. Try out a few different strategies and get a feel for what tends to work for you.
Certain groups have weird quirks.
With Assorted Meeples, for example, either the 2 or the 12 pops off every game we play. Despite the odds, or or the other will get rolled 7+ times while the other stays at its statistically expected range.
So when trying to decide between two relatively equal spaces, if one has a 2 or 12 on a resource I need…sometimes you just roll the dice and go with the gamble.
Love Board Games? Check Out These Other Great Board Game Articles
- The Complete Strategy Guide to Lords of Waterdeep
- Best Plot Quests in Lords of Waterdeep
- Complete Guide to Red Dragon Inn Decks
- Table for Two YouTube Show
We hope you found this a helpful resource. Let us know which of these Catan strategies works best for you, how the table is blown away by your new playing styles, and what spins you put on it to make it work for you.
At this point you should be a professional at setting up your opening settlements for victory during even the toughest Settlers of Catan games!
And as always, good gaming!
Please Consider Supporting Us!
Subscribe to our YouTube Channel

Proud to embrace the locally created moniker of “Corrupt Overlord” from one of the all time great Lords of Waterdeep runs, Shane is one member of the Assorted Meeples crew and will be hard at work creating awesome content for the website. He is a long-time player of board games, one time semi-professional poker player, and tends to run to the quirky or RPG side of things when it comes to playing video games. He loves tabletop roleplaying systems like Dungeons & Dragons, Pathfinder, Werewolf, Fate, and others, and not only has been a player but has run games as DM for years. You can find his other work in publications like Level Skip or Hobby Lark.